- You are here:
- Home »
- Blog »
- Power BI »
- Power Query Trim and Clean Functions

Power Query Trim and Clean Functions
In this series of blog posts, we will be examining some of the key features of Power BI Desktop, Power Query and the Power BI Service needed to pass exam DA-100: Analyzing Data with Microsoft Power BI.
The series was originally mapped to the MCSA: BI Reporting; however, the topics covered are also relevant to the newer exam DA-100.
In this topic, we will examine the Trim and Clean functions in Power Query.
When you are connecting to data, it is almost always the case that you need to make modifications to the data as it comes in and this is where the Query Editor becomes very useful. In this section we will focus on working in the Query Editor and on using its very user-friendly but powerful tools to transform the data that you are bringing in to Power BI.
Let us begin with an example which will be fairly familiar to Excel users; the need to remove extra spaces from columns of data to avoid errors and discrepancies.
In Power BI Desktop, let us Home > Get Data > Text/CSV. In sub-folder “02-Trim Clean and Case”, let us bring in the file Trim-and-clean.csv. Then, to work in the Query Editor, we click on Edit as opposed to Load.

I will also just remind you how you exit the Query Editor and how we re-enter it. Click on File > Close & Apply and this takes us out of the Query Editor and back to Power BI Desktop. Then, to get back into the Query Editor at any time, chose Edit Queries from the Home Tab of the Ribbon.
So, in the Query Editor, we have this very rich, very powerful environment at our disposal; and we will begin our look at the Query Editor, with some very useful, clean up functions. If you look at the Name column, in the imported query, you can see that we have a problem with spaces. We can see that there are spaces preceding some entries; we can also assume that there will be spaces following entries on certain rows; and we also have some extra spaces between words.

Isolating the Problem When looking to clean up text it is always useful to know what you are looking for; and one way of doing this might be to open the text file in Microsoft Word and then try and review the invisible characters. As well as opening the CSV, we can also copy the entire table from the drop-down menu in the top left of the table, and then just paste the copied data into Microsoft Word.

Once the data is pasted into Microsoft Word, using the Show Paragraph Marks feature, we can see some examples of what is going on between some of the first names and last names. In some cases, we can see the arrow symbol, which represents a Tab character. (The tiny dots represent spaces.) So, we now know that, as well as spaces, we have some entries with unwanted tabs.

Using the Trim Function
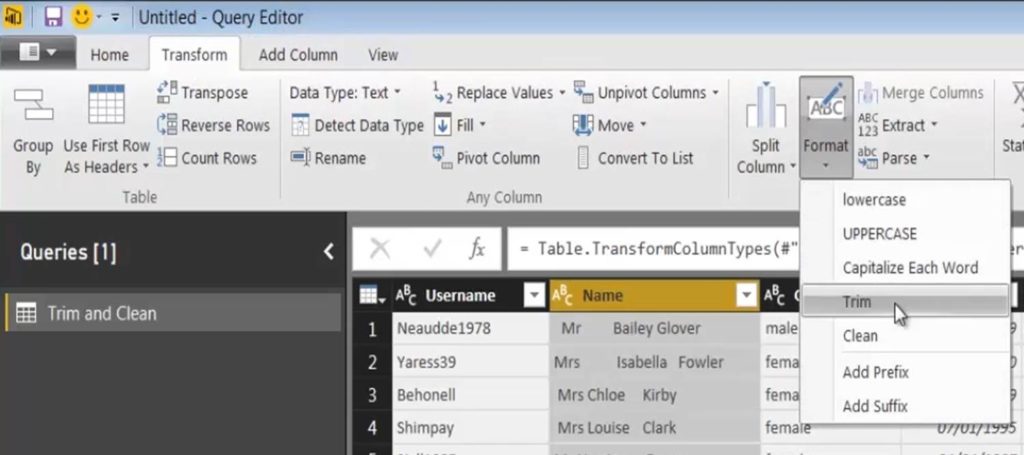
Back in the Power BI Query Editor, we begin by highlighting the Name column and activating the Transform Tab, where we will find the Format drop-down. Let us begin by using the Trim command.

You may well have come across Excel’s version of this function; the Query Editor command is very similar; it removes the leading and trialling spaces; but it does not have any effect on the spaces between words – a key difference between the M version and Excel’s offering.
Using the Clean Function
In Microsoft Word, we spotted a tab between some of the first name and last name combinations. To remove characters like tabs and returns from text entries, in Transform > Format, you chose Clean. You will see that this operation has removed a lot of extra spacing; and we can now assume that any remaining extra spaces are simply multiple occurrences of the space character.
Using the Replace Values Command
We can, therefore, use the Transform > Replace Values command to remove any remaining characters.

Let us assume that three spaces are the maximum we need to think about; so, firstly, we replace three spaces with one. If our guess is correct, then two spaces will be the maximum remaining. This time we replace two spaces with a single space.
Now, if we look at the steps we have performed, as shown in the Applied Steps pane; we have had to perform four steps to get rid of the space that we have identified; and this is typical when cleaning up data and preparing it for use in the data model.

Using the Capitalize Each Word Command
We will finish our first look at the Query Editor by modifying the gender column. Let us say we do not like lower case for this column and would prefer title case; with the first letter capitalised.
In the same place as Clean and Trim, i.e., Transform > Format, you will find the options for changing case; lowercase and UPPERCASE; and title
case is obtained with the option Capitalise Each Word.

